A bridge that has been maintained correctly can last for many years.
Bridge Position
The the way the bridge is positioned on the instrument is very important. The back side of the bridge should be at a right angle to the plane of the top of the instrument.
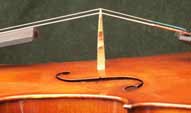
Warped bridge
Most bridge problems occur when strings are loose and need to be tuned up. As loose strings are being tuned the top of the bridge is pulled toward the fingerboard. If this position is not corrected, the downward pressure of the strings can eventually warp the bridge. Likewise, repeated tuning using the pegs without re-aligning the bridge may cause the bridge to eventually break or fall. It is reccommended that a violinist seek out a personal demonstration by a violinmaker on how to properly straighten the bridge.
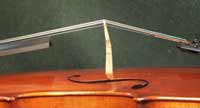
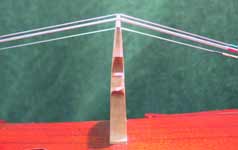
Straightening a tilted violin bridge
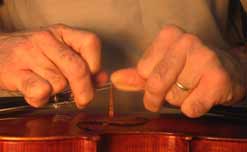
Different violinmakers use different methods of bridge straightening. Robert Cauer Violins moves the bridge in the following manner: The violinmaker holds the bridge with his thumbs, as shown here. He lays the violin on his lap with the tailpiece on the right and the scroll on the left. Next, he reaches over the bridge, keeping his thumbs pointing toward each other on top between the middle strings.
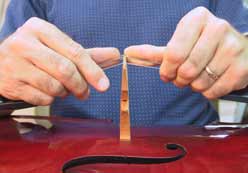
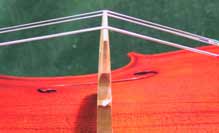
Straightening a tilted cello bridge
He reaches his index and middle finger over from the other side of the strings under the bridge. He presses his middle finger against the fingerboard and uses his thumb to create counter pressure against the bridge and move it backwards. To prevent the bridge from moving too far, he holds his right fingers in a mirror position, holding the middle finger against the tailpiece. He most not press his fingers against the highest string - the increase in pressure could cause it to break. Since only the hands are exerting pressure, the pressure between the fingerboard (tailpiece) and the bridge is cancelled out. The violin itself should not move.
If the bridge does not move with sufficient ease, the violinmaker lowers the strings one by one and then uses soft pencil graphite to lubricate the notch where the string rests against the bridge. He then retunes the instrument. One can also tune the violin one note below normal to loosen the strings slightly and thereby make the bridge easier to move. It is also advisable to inspect the strings where they contact the bridge to make sure they are in good shape. If the coil has seperated, the thin core of the string can act as a rasp and cut into the bridge. In such an instance, the string must be replaced. See replacing strings.
The height and tilt of the fingerboard are important preconditions for the correct fitting of a bridge. A bridge that is too low or overly angled toward the treble string will create margins such that it will be impossible to play without the bow hitting either one of the adjacent strings or the c-bout edge of the instrument.
If one cannot play one of the two middle strings without hitting one of the adjacent strings, this is a sign that either the curve of the bridge is wrong or the string had cut into the bridge and must be raised. One can see the relative height of the D string by holding the violin so that the A string is hidden behind the G string. This is the margin of the D string. The margin of the A string is roughly equal to that of the D string.
In the photographs below, a cello has been selected to make the demonstrtion easier to see. Here, the C string blocks the D string from view.
This depicts the margin of the G over the adjacent strings

Margin for G - front view
Here, the G blocks the A from view.
This depicts the margin of the D over the adjacent strings.
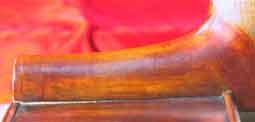
This white line indicates a loose neck
If all of the strings suddenly seem higher, immediately check the instrument to see if the neck has started to become loose. The chief indicators of a loose neck are an unvarnished line along the neck heel where it meets the upper block and a widened purfing groove under the back button.
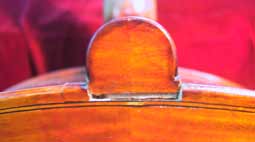
This purfing groove is widening, indicating a neck that is becoming loose.
If there is evidence of a loose neck, immediately loosen the strings. The fingerboard can slam into the top of the violin with such force that that impact can crack the soundpost and/or a bass bar. Have a qualified violinmaker repair the loose neck.